 NK Mehta
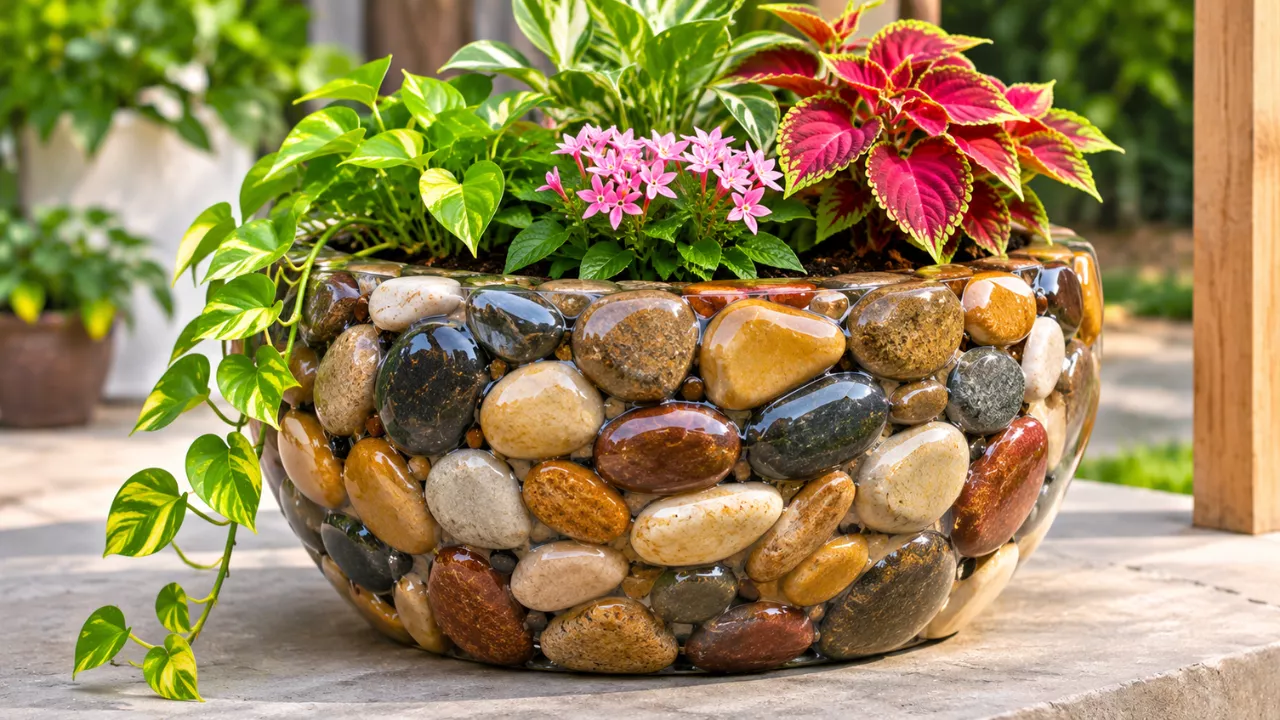
Rivers spend years shaping stones into smooth, rounded gems. Currents tumble them, water polishes them, and minerals give each one its own color. That natural beauty is exactly why a DIY river rock planter looks so striking on a porch or windowsill. Better still, you don’t need cement or special tools to make one. With a strong adhesive and some epoxy, you can turn a pile of leftover stones into a planter that looks professionally made.
Why Epoxy Beats Cement for a River Rock Planter
Cement is the traditional choice for stone planters. However, it comes with a few headaches. Stones often slide off wet cement, so the process can feel slow and messy. Mixing and pouring cement by hand is also hard work, especially for larger pots.
Epoxy, on the other hand, is far more forgiving. It grips the stones well, dries clear, and adds a glossy layer of protection. In addition, it deepens the natural colors of each rock, much like the rich tones you see when stones are wet. As a result, your planter looks vibrant all year round.
Two Ways to Build Your Planter
There are two main methods to choose from:
- The glued-rock method: Stones are attached to a plastic pot, then sealed with an epoxy coating. This creates a bumpy, textured look.
- The cast-resin method: Stones are suspended in clear casting resin inside a homemade mold. This gives a smooth, glass-like finish.
Both styles suit modern spaces as well as cozy, cottage-style gardens. So, the right choice simply depends on the look you prefer.
Supplies You’ll Need for Each Method
Before you start, gather everything in one place. That way, you won’t scramble mid-project while the glue is drying.
| Supply | Glued-Rock Method | Cast-Resin Method |
|---|---|---|
| River rocks | Under 2 inches, flat on one side | Small stones or pea gravel that fit your mold |
| Base | Plastic pot (nursery or thrift-store) | Two disposable containers that nest with a gap |
| Adhesive | Waterproof craft glue (e.g., E6000) | Not needed |
| Epoxy type | Coating epoxy for a glossy top layer | Casting resin with hardener |
| Extra tools | Gloves, drop cloth | Gloves, stir stick, craft knife |
| Curing time | Several hours per side, plus coating time | Up to a few days for a full cure |
| Drainage | Keep the existing hole open | Use a plastic liner pot inside |
First, wash your rocks well, whether you gathered them from a riverbank or bought them in bulk. Dirt and dust stop glue and epoxy from bonding properly. Then let them dry completely before you begin.
How to Make a Textured River Rock Planter With Glue and Epoxy
This method is ideal for beginners. It’s also a smart way to upcycle old plastic nursery pots that would otherwise end up in the bin.
Start by sorting your stones. Pick rocks that are about 2 inches or smaller, with at least one fairly flat side. Flat backs grip the pot much better than fully rounded stones.
Next, follow these steps:
- Begin gluing stones at the bottom of the pot, working around the drainage hole.
- Cover one side at a time, then let it dry before turning the pot.
- Continue until the whole surface is covered.
- Once the glue has fully set, brush or pour a thin layer of coating epoxy over the rocks.
- Let the epoxy cure according to the package directions.
If your planter will live outdoors, choose a waterproof, heat-resistant craft adhesive. Regular household glue may weaken in rain or summer heat. Most importantly, never cover the drainage hole. Plants need excess water to escape, or their roots can rot.
How to Cast River Rocks in Clear Epoxy Resin
Do you prefer a sleek, smooth surface? In that case, casting the stones in clear resin is the better option. This method needs a little more patience, but the result looks almost like polished glass.
Instead of a pot and glue, you’ll build a simple mold. Use two containers you don’t mind throwing away later. The smaller one should sit inside the larger one, leaving an even gap between them. That gap becomes the wall of your planter.
Choosing the Right Pouring Technique
Your approach depends on the size of your mold and stones:
- For small molds, like plastic cups: Mix the rocks into the resin first, then pour everything in together. A popsicle stick helps you nudge stones into place.
- For large molds, like bowls or buckets: Arrange the rocks in the gap first. Afterward, pour the resin slowly around them.
Once the resin sets, cut or peel away the outer container. Keep in mind that a full cure can take a few days. Since this method usually leaves no drainage hole, slip a plastic liner pot inside before planting.
Tips for a Polished, Long-Lasting Finish
A few small habits make a big difference to the final result. For example, working in a well-ventilated area keeps fumes down and helps the epoxy cure evenly. Always wear gloves, too, because resin can irritate skin.
Here are some extra pointers:
- Mix stone colors and sizes for a natural, river-bed look.
- Measure resin and hardener carefully, since wrong ratios can leave a sticky finish.
- Pour epoxy in thin layers to avoid drips and bubbles.
- Test your adhesive on one stone before covering the entire pot.
Finally, be patient. Rushing the drying stage is the most common reason rocks loosen or the finish turns cloudy.
Frequently Asked Questions
Can I use any type of rock for this planter?
Smooth river rocks work best because they bond easily and look polished. Pea gravel is also a good choice, especially for small cast-resin pots.
Is an epoxy river rock planter safe for outdoor use?
Yes, as long as you use a waterproof adhesive and seal the stones with epoxy. The coating also helps protect the rocks from weather.
How long does the epoxy take to cure?
A coating epoxy usually sets within hours, while casting resin can take a few days to cure fully. Always check the product label for exact times.
Do I need a drainage hole in my planter?
Yes, most plants need drainage to prevent root rot. Keep the original hole open on glued pots, or use a liner pot inside a cast-resin planter.